

Recently, a customer requested that the success message after submitting a Microsoft 365 Customer Insights – Journeys form (realtime) be displayed with various formatting. Additionally, a button should be added to reload the page. “How hard can it be?” I thought to myself. However, I didn’t get very far with the standard events, so some creative thinking was required. I’d like to share my approach because I believe this requirement is not that uncommon.
What is the goal?
Microsoft allows us two options after form submission: displaying plain text (without formatting or line breaks) or redirecting to an external website. But what if neither of these meets my requirements? The goal was to display the following message.

To implement a flexible approach, I still wanted to use the “Thank you notification” field, but with HTML content instead of plain text. Note, that this column only accepts 500 characters by default. If you need more, you should consider implementing your message within the code.

<h3 style="text-align: center">Thank you, we have received your request.</h3>
<p style="text-align: center">Here you get back to the
  <strong>
    <a
      style="color: #56bd00; text-decoration: none"
      href="https://www.dummypage.com"
      >Shop
    </a>
  </strong>.
</p>
<p style="color: #56db00; text-align: center">
  <strong>
    <a id="reload" style="color: #56db00; text-decoration: none" href="#"
      >Reload page</a>
    </strong>
</p>
Unfortunately, by default, the form cannot interpret HTML. Without adjustments, the HTML code would simply be displayed as text. Additionally, the message element is only created in the browser once the page is re-rendered after the form submission. Displaying the text as HTML is relatively simple, but the second point took a bit longer to figure out.
Different approaches
My first approach was to use the “d365mkt-afterformsubmit” event provided by Microsoft to search for the new element and then interpret the content as HTML. Unfortunately, at the time of this event, the page has not yet been updated, making the search for the message in the DOM unsuccessful.
The second approach was to add a timeout. This works, but it’s not ideal because you have to guess how long the rendering process of the success message will take, which might result in a “flicker” as the content is first displayed as text and then re-rendered as HTML a few milliseconds later.
The third approach was much more promising: On modern pages, especially those with infinite scrolling, the “Mutation Observer” method is often used to detect when an element is fully or partially within the visible screen area. This is much more efficient than, for example, implementing an event listener on scrolling. The great thing is that we can also use this method to observe the marketing form and respond to changes in this element.
What happens after form submission?
The <form> element disappears completely and is replaced by a <div> with the success message.
Before:

After:
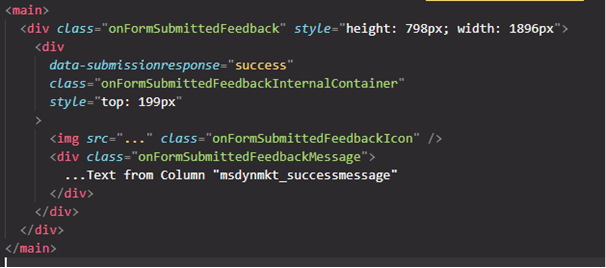
The <form> element is surrounded by a <main> element. This parent element will be observed with the Mutation Observer.
Using the Mutation Observer
I won’t go into detail about the method itself; if you want more information, the MDN web docs provide a good overview. Essentially, it waits for changes to various properties of a DOM element and allows us to react to them with a callback function.
The approach is to observe the parent <main> element and check for the presence of the success message when a change occurs. If it’s found, the content of the message is reinterpreted as HTML.
The code has a few more lines but is relatively straightforward. Let’s go through it step by step.
class RealtimeFormExtensions {
    constructor() {
        this.form = document.querySelector('form.marketingForm');// Selects the first Customer Insights Form on the page
        this.formParentElement = this.form ? this.form.parentElement : null;

        if (!this.form || !this.formParentElement) {
            return; // do not run if form or parentElement is not found.
        }

        this.formObserver = null;
        this.events();
    }

    events() {
        this._observeBodyForContentChange();
    }

    _observeBodyForContentChange() {
        this.formObserver = new MutationObserver((mutations) => {
            mutations.forEach((mutation) => {
                if (mutation.type === 'childList' && mutation.addedNodes.length > 0) {
                    const successMessage = this.formParentElement.querySelector('.formSubmittedFeedbackMessage');

                    if (successMessage) {
                        // Replace the encoded HTML entities with actual HTML
                        successMessage.innerHTML = successMessage.textContent;
                        this._cleanupObserver(); // Stop observing once the change is made
                    }
                }
            });
        });

        this.formObserver.observe(this.formParentElement, {
            childList: true,
            subtree: true
        });
    }

    _cleanupObserver() {
        if (this.formObserver) {
            this.formObserver.disconnect();
        }
    }
}

document.addEventListener('d365mkt-afterformload', function () {
    new RealtimeFormExtensions();
});
In general, I have gotten into the habit of writing in an object-oriented way, so I first define my class “RealtimeFormExtensions”. The constructor is the part of the class that is always executed when the class is instantiated – in this case, when the event d365mkt-afterformload is triggered (at the end of the code snippet). The events() method serves as a central point for me to start all necessary observations and actions that are executed by the class. Thanks to the object-oriented structure, the code remains modular, clear and easy to extend.
In the constructor (the initialization function), I search for the form using document.querySelector(‘form.marketingForm’) and then find the parent element (the <main> element) using this.form?.parentElement. If either of these isn’t found, I terminate the code at line 7.
Then, I define the variable formObserver within the class context and call the events() method, which contains all the events I want to execute. In this case, it’s just _observeBodyForContentChange(). Everything could be written more concisely, but I find it more readable this way.
The exciting part: Mutation Observer in action
Let’s take a closer look at the Mutation Observer. First, we define the observer (starting at line 19). We create a new instance of MutationObserver and define a callback function that responds to the mutations.
For each mutation, we first check whether it involves a change to the childList (mutation.type === ‘childList’) and whether at least one new element has been added (mutation.addedNodes.length > 0).
If both are true, we search for the element containing the success message: const successMessage = this.formParentElement.querySelector(‘.onFormSubmittedFeedbackMessage’).
If the element is found, it’s time to update the content. This is fairly simple: we take the textContent from the element and redefine it as innerHTML: successMessage.innerHTML = successMessage.textContent.
Finally, we stop the Mutation Observer since it’s no longer needed.
Now we need to start the Mutation Observer and tell it what to observe. This is done in line 33 with the observe method, applied to this.formObserver. As the first parameter, we pass the element to be observed (our parent element of the form), and as the second parameter, we pass some options to also monitor childList changes.
Bonus: Reload page with one click
In my sample HTML, I have included a link to reload the page. We can extend our script a little to add this functionality. To do this, we use simple standard JavaScript, but we have to make sure that we can only register the event listener, which should react to the click, when the link is also on the website, i.e. when our logic has already run.
We can add a small method to the class:
_setupReloadLink() {
        const reloadLink = document.getElementById('reload');
        if (reloadLink) {
            reloadLink.addEventListener('click', (event) => {
                event.preventDefault();
                location.reload();
            });
        }
    }
We can now call this method within the _observeBodyForContentChange() method at the end.
_observeBodyForContentChange() {
        this.formObserver = new MutationObserver((mutations) => {
            mutations.forEach((mutation) => {
                if (mutation.type === 'childList' && mutation.addedNodes.length > 0) {
                    const successMessage = this.formParentElement.querySelector('.formSubmittedFeedbackMessage');

                    if (successMessage) {
                        successMessage.innerHTML = successMessage.textContent;

                        // Now that the success message is present, set up the reload link
                        this._setupReloadLink();

                        this._cleanupObserver();
                    }
                }
            });
        });
Conclusion
By leveraging the Mutation Observer, we can elegantly overcome the limitations of the standard Microsoft 365 Customer Insights – Journeys form submission process. This approach allows us to display a flexible, formatted success message, ensuring a smoother user experience. With just a bit of clever thinking, we can extend default functionalities and offer more customization options without sacrificing performance.
Stay informed
Never miss a new post and simply subscribe to the newsletter.
Nice work! Looking forward to seeing more blog posts from you in the future Johannes
Thanks a lot, Megan 🙂
Thank you so much !! Excellent post and looking forward for more
Thanks Amal! Very much appreciated ☺️